はじめに
Get Started
このドキュメントは、ユーザーがEspressifのESP32に基づくハードウェアを使用してオーディオアプリケーションを開発するためのソフトウェア環境をセットアップするのに役立つことを目的としています。 簡単な例を通して、ESP-ADF(Espressif Audio Development Framework)の使用方法を説明します。
This document is intended to help users set up the software environment for the development of audio applications using hardware based on the ESP32 by Espressif. Through a simple example, we would like to illustrate how to use ESP-ADF (Espressif Audio Development Framework).
ESP-ADFの使用をより迅速に開始するために、Espressifは、ESP32を使用してオーディオアプリケーションを構築することを目的とした開発ボードを設計しました。 開始するには、以下のリンクをクリックしてください。
To make the start with ESP-ADF quicker, Espressif designed development boards intended to build audio applications with the ESP32. Click the links below to get started.
 |
 |
 |
|---|---|---|
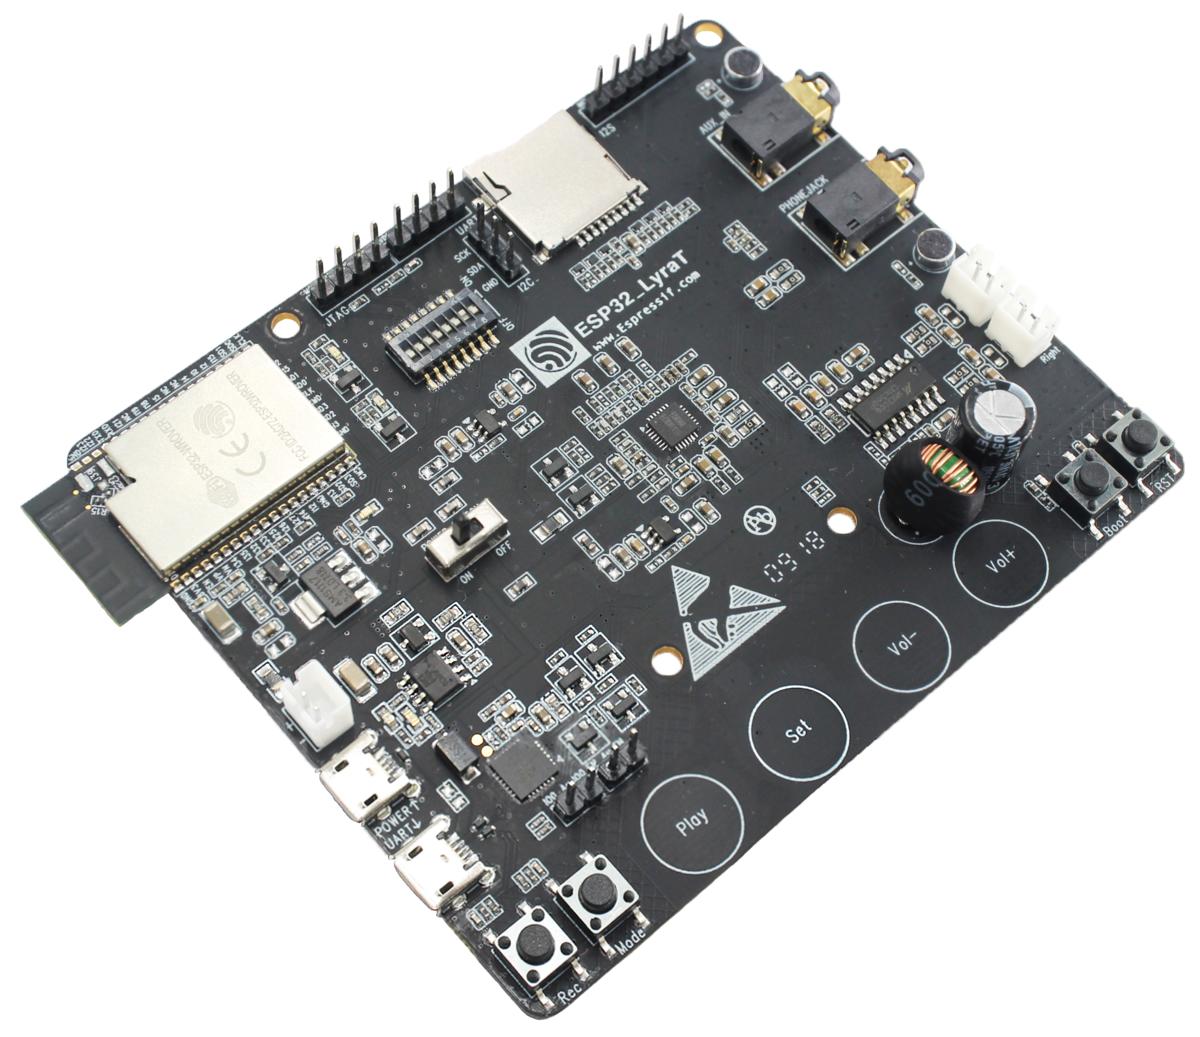
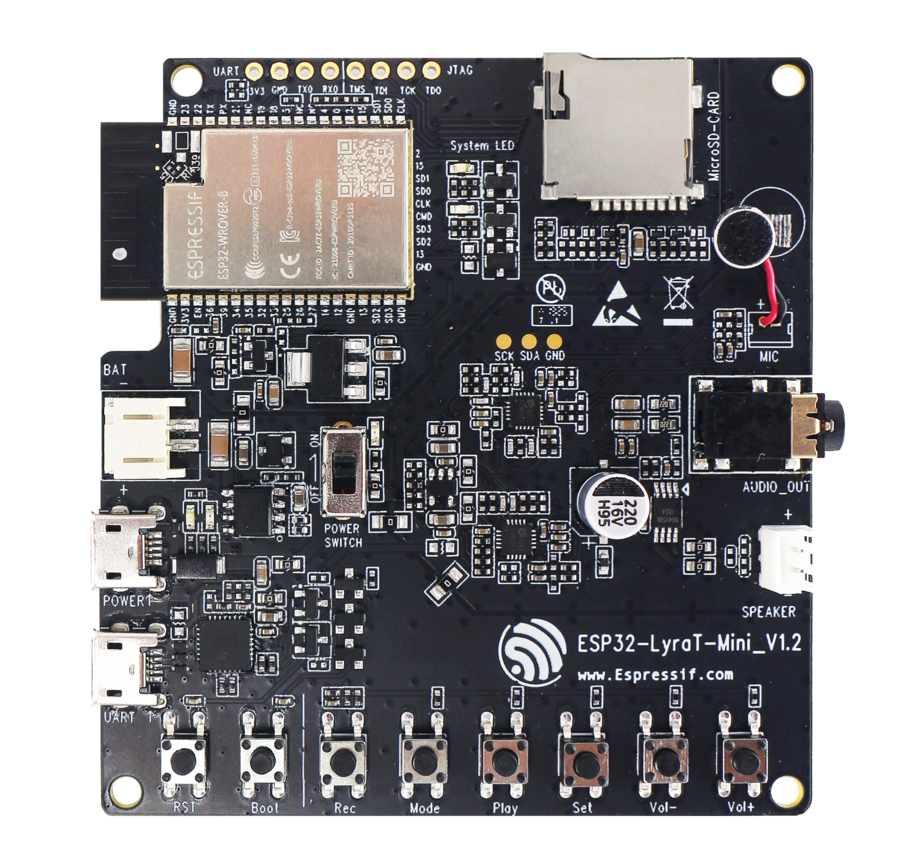
| ESP32-LyraT 入門 | ESP32-LyraTD-MSC 入門 | ESP32-LyraT-Mini 入門 |
上記のボードのいずれかがない場合でも、ESP32ベースのオーディオアプリケーションにESP-ADFを使用できます。 これは、ボードに互換性のあるオーディオコーデックまたはDSPチップが搭載されているか、特定のチップとの通信をサポートするドライバを開発していることを示しています。
If you do not have one of the above boards, you can still use ESP-ADF for the ESP32 based audio applications. This is providing your board has a compatible audio codec or DSP chip, or you develop a driver to support communication with your specific chip.
ESP-ADF について
About ESP-ADF
ESP-ADFは、ESP-IDF(Espressif IoT Development Framework)によってすでに提供されている機能を拡張するためのコンポーネントのセットとして利用できます。
The ESP-ADF is available as a set of components to extend the functionality already delivered by the ESP-IDF (Espressif IoT Development Framework).
ESP-ADFを使用するには、最初にESP-IDFを設定する必要があります。これについては、次のセクションで説明します。
To use ESP-ADF you need set up the ESP-IDF first, and this is described in the next section.
Note
ESP-ADFは、ESP-IDFのバージョンv3.3.1を使用して開発されています。 すでに別のバージョンを設定している場合は、v3.3.1に切り替えてください。そうしないと、ESP-ADFアプリケーションをコンパイルできない場合があります。
ESP-ADF is developed using v3.3.1 version of ESP-IDF. If your have already set up another version, please switch to the v3.3.1, or you may not be able to compile ESP-ADF applications.
ESP-IDFを設定する
Set up ESP-IDF
ESP32ドキュメントに従ってPCを構成します。 Windows、Linux、MacOSオペレーティングシステムがサポートされています。
Configure your PC according to ESP32 Documentation. Windows, Linux and Mac OS operating systems are supported.
makeを使用するコマンドラインまたはEclipse IDEを使用して、コードをコンパイルしてESP32にアップロードすることを選択できます。
You have a choice to compile and upload code to the ESP32 by command line with make or using Eclipse IDE.
Note
~/espディレクトリを使用して、ツールチェーン、ESP-IDF、ESP-ADF、およびサンプルアプリケーションをインストールしています。 別のディレクトリを使用できますが、それぞれのコマンドを調整する必要があります。
We are using ~/esp directory to install the toolchain, ESP-IDF, ESP-ADF and sample applications. You can use a different directory, but need to adjust respective commands.
インストールを簡単にし、エラーが発生しにくいようにするには、インストールに~/espデフォルトディレクトリを使用します。 ESP-IDFのセットアップを完了し、ESP-ADFに移動すると、ESP-ADFのインストールが同様のプロセスに従うことに気付くでしょう。 これにより、ESP-ADFの起動と実行がさらに簡単になります。
To make the installation easier and less prone to errors, use the ~/esp default directory for the installation. Once you get through ESP-IDF setup and move to the ESP-ADF, you will notice that installation of the ESP-ADF follows the similar process. This should make it even easier to get up and running with the ESP-ADF.
これがESP32およびESP-IDFに初めて触れる場合は、最初に hello_worldと blink のサンプルに慣れることをお勧めします。 これら2つの例をビルド、アップロード、実行できるようになったら、次のセクションに進む準備ができています。
If this is your first exposure to the ESP32 and ESP-IDF, then it is recommended to get familiar with hello_world and blink examples first. Once you can build, upload and run these two examples, then you are ready to proceed to the next section.
ESP-ADFを入手する
Get ESP-ADF
ESP32用のアプリケーションをコンパイル、ビルド、アップロードするためのESP-IDFがあれば、オーディオ固有のAPI / ライブラリのインストールに移ることができます。 それらはESP-ADFリポジトリで提供されます。 取得するには、ターミナルを開き、ディレクトリに移動してESP-ADFを配置し、git cloneコマンドを使用してクローンを作成します:
Having the ESP-IDF to compile, build and upload application for ESP32, you can now move to installing audio specific API / libraries. They are provided in ESP-ADF repository. To get it, open terminal, navigate to the directory to put the ESP-ADF, and clone it using git clone command:
cd ~/esp
git clone --recursive https://github.com/espressif/esp-adf.git
ESP-ADFは~/esp/esp-adfにダウンロードされます。
ESP-ADF will be downloaded into ~/esp/esp-adf.
Note
--recursiveオプションをお見逃しなく。 このオプションなしでESP-ADFのクローンを作成している場合は、別のコマンドを実行してすべてのサブモジュールを取得します:
Do not miss the --recursive option. If you have already cloned ESP-ADF without this option, run another command to get all the submodules:
cd ~/esp/esp-adf
git submodule update --init
ESP-ADFへのセットアップパス
Setup Path to ESP-ADF
ツールチェーンプログラムは、ADF_PATH 環境変数を使用してESP-ADFにアクセスします。 この変数はPCで設定する必要があります。設定しないと、プロジェクトがビルドされません。 設定するプロセスは、ADF_PATH 変数の設定に似ています。ESP-IDFドキュメントの「ユーザープロファイルへのIDF_PATHの追加」の手順を参照してください。
The toolchain programs access ESP-ADF usingADF_PATHenvironment variable. This variable should be set up on your PC, otherwise the projects will not build. The process to set it up is analogous to setting up theIDF_PATHvariable, please see instructions in ESP-IDF documentation under Add IDF_PATH to User Profile.
Start a Project
最初の準備が完了すると、ESP32用の最初のオーディオアプリケーションを構築する準備が整います。 このプロセスは、ESP-IDFのドキュメントですでに説明されています。 ここで、重要な手順について再度説明し、ツールチェーンがADF_PATH変数を使用してESP-ADFコンポーネントにアクセスする方法を示します。
After initial preparation you are ready to build the first audio application for the ESP32. The process has already been described in ESP-IDF documentation. Now we would like to discuss again the key steps and show how the toolchain is able to access the ESP-ADF components by using the ADF_PATH variable.
Note
ESP-ADFは、ESP-IDFの特定のリリースに基づいています。 このリリースは、ESP-ADFをサブディレクトリとして、より具体的にはサブモジュールとして複製されています。 GitHubに表示されるesp-idf @ ca3faa61。 この指示に従うだけで、ビルドスクリプトはサブモジュールからESP-IDFに自動的に到達します。
ESP-ADF is based on a specific release of the ESP-IDF. You will see this release cloned with ESP-ADF as a subdirectory, or more specifically as a submodule e.g. esp-idf @ ca3faa61 visible on the GitHub. Just follow this instruction and the build scripts will automatically reach ESP-IDF from the submodule.
アプリケーションを構築する方法を示すために、ADFのexamplesディレクトリからget-started/play_mp3プロジェクトを使用します。
To demonstrate how to build an application, we will use get-started/play_mp3 project from examples directory in the ADF.
get-started/play_mp3を~/espディレクトリにコピーします:
Copy get-started/play_mp3 to ~/esp directory:
cd ~/esp
cp -r $ADF_PATH/examples/get-started/play_mp3 .
また、ESP-ADFリポジトリのexamplesディレクトリの下にさまざまなサンプルプロジェクトがあります。 これらのサンプルプロジェクトディレクトリは、上記と同じ方法でコピーして、独自のプロジェクトを開始できます。
You can also find a range of example projects under the examples directory in the ESP-ADF repository. These example project directories can be copied in the same way as presented above, to begin your own projects.
接続して構成する
Connect and Configure
オーディオESP32ボードをPCに接続し、ボードが表示されているシリアルポートを確認し、ESP-IDFドキュメントの説明に従ってシリアル通信が機能するかどうかを確認します。
Connect the audio ESP32 board to the PC, check under what serial port the board is visible and verify, if serial communication works as described in ESP-IDF Documentation.
ターミナルウィンドウで、play_mp3アプリケーションのディレクトリに移動し、シリアルポート、アップロード速度、およびオーディオボードのバージョンを選択してmenuconfigで構成します:
At the terminal window, go to the directory ofplay_mp3application and configure it withmenuconfigby selecting the serial port, upload speed and the audio board version:
cd ~/esp/play_mp3
make menuconfig
構成を保存します。
Save the configuration.
ビルド、フラッシュ、モニター
Build, Flash and Monitor
これで、アプリケーションをビルド、アップロード、およびチェックできます。 実行:
Now you can build, upload and check the application. Run:
make flash monitor -j5
これにより、ESP-IDF / ESP-ADFコンポーネントを含むアプリケーションが構築され、バイナリがESP32ボードにアップロード(フラッシュ)され、モニターが起動します。
This will build the application including ESP-IDF / ESP-ADF components, upload (flash) binaries to your ESP32 board and start the monitor.
アップロード
Upload
バイナリをアップロードするには、ボードをアップロードモードにする必要があります。 これを行うには、ブートボタンを押したまま、リセットボタンを一瞬押して、ブートボタンを放します。 アップロードモードは、アプリケーションのビルド中いつでも開始できますが、遅くとも「接続中」メッセージが表示されます:
To upload the binaries, the board should be put into upload mode. To do so, hold down Boot button, momentarily press Reset button and release the Boot button. The upload mode may be initiated anytime during the application build, but no later than “Connecting” message is being displayed:
...

esptool.py v2.1
Connecting........_____....
アップロードモードを有効にしないと、いくつかの....._____が表示された後、接続は最終的にタイムアウトになります。
Without the upload mode enabled, after showing several ....._____, the connection will eventually time out.
ビルドとアップロードが完了すると、次のように表示されます:
Once build and upload is complete, you should see the following:
...

Leaving...
Hard resetting...
MONITOR
--- idf_monitor on /dev/ttyUSB0 115200 ---
--- Quit: Ctrl+] | Menu: Ctrl+T | Help: Ctrl+T followed by Ctrl+H ---
モニター
Monitor
この時点で、リセットボタンを押してアプリケーションを起動します。 起動ログの数行に続いて、play_mp3アプリケーション固有のメッセージが表示されます:
At this point press the Reset button to start the application. Following several lines of start up log, the play_mp3 application specific messages should be displayed:
...

I (303) PLAY_MP3_FLASH: [ 1 ] Start audio codec chip
I (323) PLAY_MP3_FLASH: [ 2 ] Create audio pipeline, add all elements to pipeline, and subscribe pipeline event
I (323) PLAY_MP3_FLASH: [2.1] Create mp3 decoder to decode mp3 file and set custom read callback
I (333) PLAY_MP3_FLASH: [2.2] Create i2s stream to write data to codec chip
I (343) PLAY_MP3_FLASH: [2.3] Register all elements to audio pipeline
I (353) PLAY_MP3_FLASH: [2.4] Link it together [mp3_music_read_cb]-->mp3_decoder-->i2s_stream-->[codec_chip]
I (363) PLAY_MP3_FLASH: [ 3 ] Setup event listener
I (363) PLAY_MP3_FLASH: [3.1] Listening event from all elements of pipeline
I (373) PLAY_MP3_FLASH: [ 4 ] Start audio_pipeline
W (373) AUDIO_ELEMENT: [mp3] RESUME:Element has not running,state:3,task_run:1
W (393) AUDIO_ELEMENT: [i2s] RESUME:Element has not running,state:3,task_run:1
I (403) PLAY_MP3_FLASH: [ * ] Receive music info from mp3 decoder, sample_rates=44100, bits=16, ch=2
W (433) AUDIO_ELEMENT: [i2s] RESUME:Element has not running,state:3,task_run:1
I (7183) PLAY_MP3_FLASH: [ 5 ] Stop audio_pipeline
W (7183) AUDIO_PIPELINE: There are no listener registered
上記のログ以外に問題がなければ、オーディオボードに接続されたスピーカーまたはヘッドホンで約7秒間再生される音が聞こえるはずです。 必要に応じて、ボードをリセットしてもう一度聞いてください。
If there are no issues, besides the above log, you should hear a sound played for about 7 seconds by the speakers or headphones connected to your audio board. Reset the board to hear it again if required.
これで、他のいくつかの例を試す準備ができました。または、独自のアプリケーションの開発に取り掛かることができます。 例がESP-ADFの場所をどのように認識しているかを確認してください。 get-started/play_mp3/Makefileを開くと、次のように表示されます。
Now you are ready to try some other examples, or go right to developing your own applications. Check how the examples are made aware of location of the ESP-ADF. Open the get-started/play_mp3/Makefile and you should see
PROJECT_NAME := play_mp3
include $(ADF_PATH)/project.mk
2行目には、ツールチェーンがESP-ADFを指すようにする$ADF_PATHが含まれています。 ESP-ADFで開発された独自のアプリケーションにも同様のMakefileが必要です。
The second line contains$ADF_PATHto point the toolchain to the ESP-ADF. You need similarMakefilein your own applications developed with the ESP-ADF.
ESP-ADFを更新する
Update ESP-ADF
ESP-ADFをしばらく使用した後、新機能やバグ修正を利用するために更新することをお勧めします。 これを行う最も簡単な方法は、既存のesp-adfフォルダーを削除して再度クローンを作成することです。これは、「ESP-ADFの取得」セクションで説明されている初期インストールを実行する場合と同じです。
After some time of using ESP-ADF, you may want to update it to take advantage of new features or bug fixes. The simplest way to do so is by deleting existing esp-adf folder and cloning it again, which is same as when doing initial installation described in sections Get ESP-ADF.
別の解決策は、変更されたものだけを更新することです。 このメソッドは、GitHubへの接続が遅い場合に役立ちます。 更新を行うには、次のコマンドを実行します:
Another solution is to update only what has changed. This method is useful if you have a slow connection to the GitHub. To do the update run the following commands:
cd ~/esp/esp-adf
git pull
git submodule update --init --recursive
git pullコマンドは、GitHubのESP-ADFリポジトリから変更をフェッチしてマージしています。 次に、git submodule update --init --recursiveは、既存のサブモジュールを更新するか、新しいサブモジュールの新しいコピーを取得します。 GitHubでは、サブモジュールは他のリポジトリへのリンクとして表され、PCに取り込むにはこの追加コマンドが必要です。
Thegit pullcommand is fetching and merging changes from ESP-ADF repository on GitHub. Thengit submodule update --init --recursiveis updating existing submodules or getting a fresh copy of new ones. On GitHub the submodules are represented as links to other repositories and require this additional command to get them onto your PC.